
Nail Art Instruments, do you intend to create lovely nail art but are intimidated by the equipment? Having the right “nail art instruments” is crucial to your ability to succeed.
This straightforward guide covers it all, including essential fundamentals and expert advice.
Nail art is an enjoyable and artistic method to showcase your individuality, and it has become easier than ever due to the variety of instruments available that enable you to get salon-quality results at home. Regardless of whether you are new to nail art or seeking to enhance your home manicure collection, possessing the appropriate instruments is essential for achieving beautiful nail designs.
From basic dots to complex patterns, these vital instruments will prepare you for achievement. Let’s look into some essential Nail Art instruments every beginner requires, along with extra tips to elevate your nail art experience.
The significance of possessing the appropriate instruments
Nail implements are utilized to groom your natural nails and can also be employed during a manicure to create nail designs, for instance. The material typically consists of metal, except for the orange wood sticks, which are crafted from wood. The reason is that the material can be cleaned and disinfected easily. The orange wood cuticle sticks are meant for one-time use.
Possessing the right “Nail Art instruments” is not merely advantageous—it’s crucial. The appropriate instruments offer you precision and control, turning unsteady efforts into sharp, polished designs.
They simplify the process, speed it up, and enhance enjoyment, enabling you to realize any creative idea on your nails.
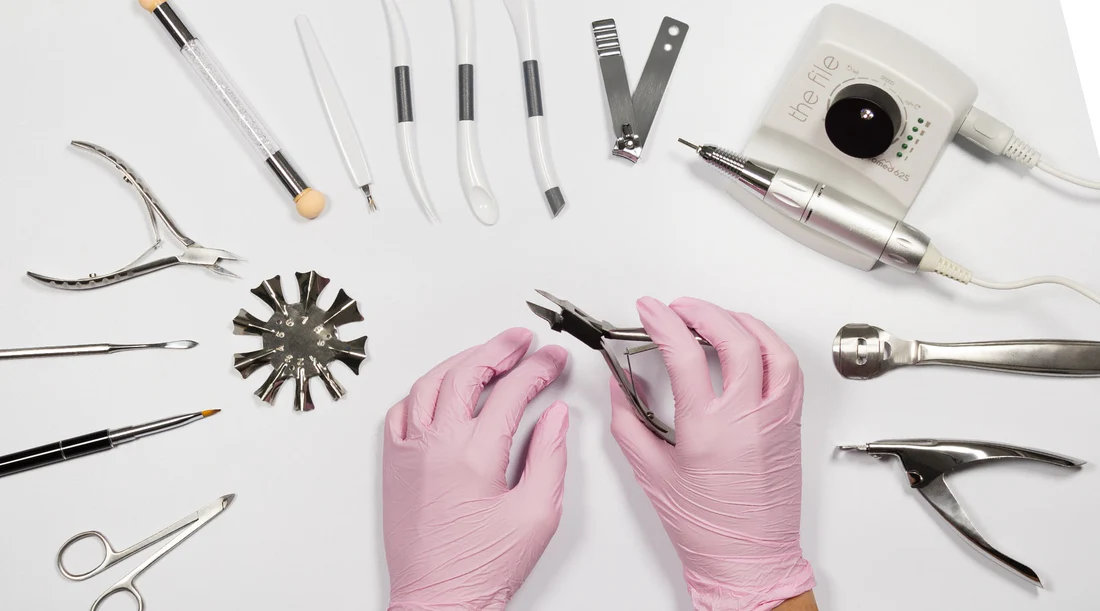
Mention the range of nail polish accessories, manicure art implements, and decoration items. For a manicure or pedicure, various nail instruments are required. Instruments are also utilized to apply nail art onto the nails. Nail accessories are essential for trimming your nails, pushing back and cutting your cuticles, etc. There are various nail instruments include:
Cuticle remover:
A cuticle pusher helps in pushing back and removing the cuticles. Certain cuticle pushers feature two sides: one side is utilized for pushing back the cuticles. The opposite side is utilized to soften the cuticles and eliminate any leftover skin debris.
- Relocate cuticles: Utilize the curved section of the cuticle pusher to retract the cuticles.
- Remove cuticles: Utilize the pointed edge to eliminate cuticles and surplus skin.
Cuticle scissors
Cuticle scissors are used to safely remove cuticles and any extra skin particles. This instrument enables you to prepare the nail plate with precision. Additionally, cuticle scissors can be used to shape templates as required.
Nail clippers
Cuticle tissue can be precisely removed with cuticle nippers. They have sharp jaws that allow you to safely trim cuticles without causing them to tear.
Nail scissors
You can precisely and carefully shorten or shape your nails with nail scissors. These instruments are typically used for both manicure and pedicure treatments. They can also be used to cut nail art stickers or stencils.
Tweezers
Tweezers are versatile instruments that can be used for multiple tasks. They can be used to pluck eyebrows, and fine hairs can be removed easily. They are also useful for removing ingrown hairs or splinters. Tweezers can be used to apply nail art to the nails.
How to clean and disinfect instruments?
Nail technicians encounter the difficulty of maintaining the cleanliness of their instruments and working spaces every day. Disinfection is crucial for stopping the transmission of infections and ensuring client health. Here we will discuss key elements of disinfection for nail technicians, encompassing techniques, instruments, and essential advice for upholding hygiene practices.
- The significance of sanitization: Disinfection within the nail industry is essential for various reasons:
- Infection Prevention: Instruments and surfaces can transfer microorganisms like bacteria, viruses, and fungi. Effective disinfection aids in eliminating pathogens and stopping the transmission of infections.
- Safeguarding the well-being of clients and workers: Adhering to hygiene protocols guarantees safety for both clients and workers. This holds particular significance during pandemics and surges of contagious illnesses.
- Regulations: Numerous nations enforce stringent guidelines and norms for sanitization in beauty establishments. Noncompliance with these regulations may lead to penalties and the shutdown of the business. The primary phases of disinfection.
The disinfection procedure consists of multiple essential phases:
- Cleaning: Instruments and surfaces need to be completely free of visible contaminants before disinfection. To achieve this, you can utilize soap and water or specific cleaning products.
- Disinfection: Following cleaning, instruments and surfaces must be sanitized with disinfectants. This could be a spray, liquid, or wipes containing a disinfectant.
- Sterilization: Certain instruments need more extensive treatment – sterilization. This is done using autoclaves or dry-heat ovens.
- Sanitizing agents: Many disinfectants are available for purchase, but their effectiveness varies significantly. Let’s examine the most favored choices:
- Alcohol solutions: Ethanol or isopropanol effectively combats the majority of bacteria and viruses. It is utilized for rapid sanitation of instruments and surfaces. Nonetheless, alcohol can be harsh on certain materials and lead to their deterioration
- Quaternary ammonium compounds: These agents exhibit a wide range of effectiveness against bacteria, viruses, and fungi. They are milder than alcohol solutions and can treat the majority of instruments.
- Chlorhexidine: Chlorhexidine is a potent antimicrobial agent utilized for treating skin and sterilizing instruments. It works well against bacteria and fungi, but is not as effective against viruses.
- Hydrogen Peroxide: It serves to sanitize surfaces and instruments. It exhibits strong antimicrobial properties and is safe for the environment.
- Autoclaves and Dry Heaters: These machines serve to sterilize instruments using elevated temperatures. Autoclaves operate with steam, whereas dry heaters function with hot air. Both techniques guarantee the elimination of all varieties of microorganisms.
Disinfection is a crucial aspect of a nail technician’s job. Adhering to hygiene standards and the proper application of disinfectants aids in preventing the transmission of infections and guarantees the safety of both clients and artists. Consistent training and oversight of adherence to disinfection protocols are essential for effective salon functioning and building client confidence.
Types of Nail Art instruments
Grasping the various kinds of Nail Art instruments is the initial step to unleashing your creativity. Every instrument is crafted for a particular function, transforming intricate concepts into realizable designs within the home. Whether you’re starting from scratch or aiming to enhance your gear, understanding these categories aids in selecting the ideal instruments.
Nail instruments are utilized to ready your natural nails and can additionally be employed in a manicure to apply nail designs, for instance. The material typically consists of metal, except for the cuticle orange wood sticks that are crafted from wood. This is due to the fact that the material can be easily cleaned and disinfected. When utilizing the orange wood sticks for cuticles, the stick is meant for one-time use.
The appropriate instruments are not merely acquisitions; they are investments in your well-being and creative expression. They offer the accuracy and command required for results that look professional, enhancing the overall experience and effectiveness. Below are the main categories of instruments you will find, ranging from necessary nail polish items to sophisticated manicure art instruments:
- Dotting instruments: These tiny sticks with a metal ball at the end are ideal for creating accurate dots on your nails. They are available in different sizes and are also excellent for adding rhinestones and other decorations.
- Brush for painting: Various brush types are required for various jobs. Slim, delicate brushes are perfect for detailed designs and lines, whereas wider brushes are more suited for laying down color and achieving gradients.
- Nail adhesive tape: Like nail stencils, nail tapes can also be utilized to form straight lines or designs on your nails. They are particularly beneficial for styles such as geometric designs or French manicures.
- Sparkle, gems, and adornments: To achieve the highest bling effect, nails can be adorned with glitter, rhinestones, and various other decorations. They’re an excellent method to enhance your nail art and incorporate a unique aspect.
- Stamp for nail art: Using a stamping kit, you can easily transfer complex patterns onto your nails. You’ll require specific stamping polishes and a stamping plate featuring your chosen design.
Crucial Nail Art Supplies Every Novice Should Understand
Nail art starts with the appropriate instruments, particularly when you’re exploring and trying out new designs. From painting and detailing to application and unique techniques, every type of nail art instrument is essential for streamlining the process, enhancing cleanliness, and increasing enjoyment. Utilizing appropriate instruments enhances outcomes and fosters confidence, enabling beginners to safely practice as they progressively learn creative nail techniques.
- For Painting & Detailing: This encompasses essential Nail Art instruments such as different brushes for lines and filling, dotting instruments for achieving precise circles, and striping instruments for neat geometrical designs.
- For Application & Embellishment: Nail decoration instruments include precise instruments such as tweezers for gem placement, specialized applicators for nail polish, and color palettes for creating custom hues.
- For Specialized Techniques: Those trying out gel polish need specific gel nail instruments (such as lamps). Novices significantly gain from practice fingers, an essential resource for safe learning.
Essential Instruments for Nail Art Designs at Home
Achieving salon-quality appearances is simpler than you realize with the proper instruments for nail art creations. An easy, user-friendly kit enables you to discover creativity without feeling overwhelmed. The secret lies in using adaptable instruments that evolve with your abilities, enabling stunning gel polish designs to be possible for everyone.
To achieve beautiful gel nails at home, several specific products are essential. Achieving success with methods such as Gel X at home depends on adequate preparation and experience. Here’s the method to establish your base:
- Keep It Basic: Initiate with essential instruments for nail art creations: a detail brush, a dotting instrument, striping tape, and tweezers. These are ideal for mastering fundamentals prior to advancing to gel.
- Gel Essentials: To create gel polish art, you will require a UV/LED lamp, gel base and top coat, along with brushes compatible with gel. Include a kit with nail tips and a long-lasting gel stick for Gel X at home.
- Simplify Decoration: Employ striping nail polish or striping tape nail art to easily design neat lines and geometric shapes.
- Repetition Leads to Mastery: Allocate resources to practice finger nails and hands for nail techniques. They provide the most effective means to evaluate designs and establish confidence without any risk.
- Essential methods for crafting impressive designs: Here are fundamental nail art designs and techniques that serve as excellent foundations for more advanced methods. While you practice, you will enhance your abilities and discover your distinct style.
- Spotting: This fundamental nail art method is adaptable and simple to master, serving as a great foundation for newcomers. It enables you to create a range of designs, from straightforward and minimalist to intricate and elaborate. Dotting also instructs you on how to intentionally position designs and control the amount of polish on your instrument.
- Absorbing: Sponging is excellent for achieving textured appearances, ombre styles, and gentle color gradients that can truly enhance your manicure. Directly apply a little bit of your selected nail polish onto the sponge, pressing the colors closely together. Softly dab the sponge on your nails. You may apply multiple dabs or layer various hues, based on the effect you wish to achieve.
- Marbleizing: Marbling creates a swirling design on the nails, resembling the look of marble stone. This method can be applied using water or straight onto the nail.
Water marbling consists of spreading nail polish on water’s surface to form a pattern and then dipping the nails into that pattern. Conversely, dry marbling is performed directly on the nail, utilizing a small instrument to mix various colored polishes applied in dots or brief strokes.
Producing impressive designs depends on grasping essential design principles, comprehending color theory and typography, and regularly honing your abilities.
Fundamental Design Guidelines
Command over these principles guarantees a unified and influential design.
- Harmonization and Positioning: Each component carries visual weight. Employ alignment to establish order and harmony in your composition, utilizing symmetry for stability or asymmetry for visual intrigue.
- Contrast: Contrast allows a design to “stand out” and improves readability. Utilize variations in color, size, or weight to direct the viewer’s attention and highlight key elements.
- Organization and Focus: Intentionally arrange components so the audience understands what to observe initially. The key element of your message ought to be the most visually prominent aspect.
- Repetition: Using certain elements (such as particular fonts or colors) consistently unifies a design and enhances its overall identity.
- White Space (Negative Space): This refers to the area that is not filled with visual components. Abundant white space allows elements to have space to “breathe,” enhances readability, and avoids a chaotic layout.
- Proportion: Denotes the visual scale and mass of components in relation to one another. Appropriate proportion guarantees that every element is appropriately sized and carefully positioned.
Typography Methods
Typography serves as the foundation of graphic design; selecting the right fonts can enhance an entire project.
- Typeface Limitation: Use a minimal selection of one or two font families to ensure consistency and enhance readability.
- Employ Fonts to Convey Mood: Select typefaces that align with the character of your content (e.g., rounded fonts seem more inviting; sharp, geometric fonts appear sturdy and robust; serifs suggest elegance).
- Maintain Spacing: Carefully modify letter spacing (kerning) and line spacing (leading) to promote readability and a polished appearance.
- Hue and Visuals: Hue establishes the atmosphere, while visuals can draw interest powerfully.
- Restrict Color Palettes: Select a main set of 1–3 primary and 1–3 secondary colors to ensure uniformity. Employing various shades of the same hue is a great method to create contrast.
- Begin with Grayscale Design: Initiate a design using black and white to concentrate on layout, spacing, and hierarchy, introducing color intentionally later in the workflow.
- Maintain Contrast for Clarity: If your background is light, opt for a dark font, and the opposite applies. Modify the brightness and contrast of the image to ensure the text is legible and easily readable.
Hands-on Workflow and Procedure
- Research and Mood Boards: Prior to beginning the design process, collect all essential information and create a mood board featuring color swatches, images, and other visual elements for inspiration and theme creation.
- Mimic and Reproduce: Analyze designs you appreciate and attempt to reproduce their structure, typography, or filters for educational reasons. This aids you in grasping the fundamental framework of an effective design.
- Accept Experimentation: Design involves repeating processes. Test your designs extensively, collect input, and stay open to trying new approaches and improving your creations.• Master Design Instruments: Acquire expertise in essential software such as Adobe Illustrator, Photoshop, or Figma, since much of design work depends on efficiently utilizing these applications.
How to Use Nail Art Instruments
Now that you are familiar with the key instruments, let’s discuss the proper ways to utilize them:
- Dotting instruments: Gently immerse the metal ball in the nail polish and then apply a dot onto your nail. Based on the intended size, you can immerse the instrument deeper or deeper.
- Brushes: Ensure your brushes are completely clean prior to use to avoid any paint leftovers impacting the quality of your design. Try practicing on a sheet of paper before applying paint directly to your nails.
- Nail stencils: Place the stencil on the ready nail and then paint over it with nail polish. Pause for a moment, then gently remove the stencil before the polish dries fully.
- Nail Art Stamp: Coat the stamping plate with the stamping polish on the chosen pattern and scrape off the surplus ink using a scraper card. Apply the stamper to the design and then move it to your nail.
- Nail tape: Trim the nail tape to the preferred length and shape, then gently adhere it to the nail. Ensure it fits tightly to avoid nail polish leaking underneath. Coat the tape with nail polish and gently peel it off before the polish dries fully.
- Cuticle remover: Dispense a small quantity of cuticle remover onto the cuticles and allow it to rest for a few seconds. Next, utilize a cuticle pusher or rosewood stick to carefully push back the cuticles from the nails. Take care not to push the cuticles back too forcefully or too deeply to prevent injury.
Process Instructions & Recommended Strategies
Perfecting your “Nail Art instruments” transforms concepts into impeccable creations. Employing the correct method with every instrument is essential for mastery and achieving a professional outcome, whether you’re beginning with basic polish or progressing to gel. Let’s analyze the essential steps and effective methods.
A systematic approach makes all the difference. Use this comprehensive guide to develop your skills effectively, concentrating on the essential “Nail Art instruments” that every artist requires.
- Organize Your Work Area: Arrange your space in a well-lit location. Ensure all “Nail Art instruments” are clean and prepared, including a “nail color palette” for applying polish.
- Applying Polish Evenly: Utilize the brush from the bottle for the base coat. For specifics, place a drop of polish on your mixing tray. Soak only the end of your “nail polish applicator” or brush, remove excess, and apply with gentle, even strokes.
- Employing Instruments for Design: For sharp edges, use “striping tape” on a dry base, apply paint over it, and remove it right away. Utilize “nail tweezers” for accurately positioning gems or decals without smearing.
- Practicing & Perfecting: Use “practice fake nails” before attempting a new style on yourself. They serve as the ideal risk-free platform for experimenting with color combinations and honing skills.
Tips for Professional Nail Art
Attaining a professional-looking finish at home depends on skill and the appropriate manicure instruments. These expert suggestions will assist you in crafting tidy, durable designs with increased efficiency and precision, turning your DIY projects into polished works of art.
The key is a blend of careful planning, high-quality Nail Art instruments, and savvy practice. Putting money into several essential items can significantly enhance your outcomes.
Expert Tips for Perfect Outcomes
- Preparation is Key: A clean, dry, and gently buffed nail serves as the crucial foundation for any expert design.
- Purchase Precision Instruments: To ensure precision, enhance your kit with premium detail brushes and a dependable, fast-drying top coat. Crucial nail enhancement instruments such as nail tweezers are indispensable for accurately positioning gems and decals.
- Ultimate Clean-Up: Employ a tiny brush soaked in polish remover to tidy up the skin surrounding your nails right after applying the polish. This one action ensures sharp, refined edges.
- Repetition Leads to Retention: Avoid missing out on practice! Practicing nails on hands lets you try out fresh techniques and develop muscle memory without stress, increasing your speed and confidence.
Additional advice for Professional Nail Art includes:
- Applying a base coat and a top coat is essential: There are many various ones that serve different purposes, so conduct some research on them and discover the best options for you.
- Maintain your cuticles. To ensure your manicure endures, first, you need to clean up your cuticles.
- I discover that utilizing matte polish for nail designs often makes it simpler since they tend to smudge less once the top coat is applied (at least in my experience).
- Before using nail vinyl’s, apply a top coat; you have to believe me.
- Always have a bottle of acetone and a brush nearby to correct your errors (nail polish seeping into cuticles, etc.).
- Consistently clean your brush while working, and remember to clean dotting instruments after each use to maintain the clarity and precision of your design.
- Sponges are excellent for creating gradients and extracting more shimmer from your nail polish.
- Attempt to draw your concept or, at the very least, keep reference images visible to avoid confusion.
- If you’re using regular nail polish, be patient; take your time and allow sufficient drying time between coats. It’s wiser to wait than to redo everything since you blurred it.
- Apply in thin layers instead of thick ones. Working in thin layers will save you time, as thick layers take longer to dry and may remain wet indefinitely.
- I recommend considering gel polishes for extreme nail art, as gel truly simplifies the process. It’s really pleasant and easy to handle; just be cautious not to let it come into contact with your skin excessively.
- Acrylic paint can also be employed for creating nail art.
- Above all, show kindness and patience toward yourself. At times, your nail art will turn out flawlessly, while other times it may not. Just keep in mind that practice leads to perfection, so continue honing your skills and you’ll reach your desired level! And of course, always keep in mind to enjoy your little creations; you can achieve this.
Final thoughts
Your exploration of the stunning realm of nail art starts and concludes with the proper instruments. As we’ve discussed, possessing the right “Nail Art instruments”—ranging from basic brushes and dotting implements to unique gel kits and training aids—is what changes a challenging endeavor into an enjoyable, inventive, and effective means of self-expression.
These instruments offer the control, accuracy, and assurance required to perform everything from basic stripes to complex patterns with a polished result. They aren’t merely acquisitions; they represent a commitment to your creativity and an entry point to endless hours of fulfilling, enjoyable artistry.
Use these essential items to start your nail art journey right now.
Discover our thoughtfully curated kits and collections to uncover the ideal instruments for realizing your distinct ideas.

One thought on “Nail Art Instruments – Everything You Need to Know”